1/16/2018

Visual Studio Code, Selenium, Firefox, JavaScript and Mocha with Chai

Let's leave Netbeans IDE to Java and start using lightweight Visual Studio Code for JavaScript test automation.

Preconditions:
  • Node.js installed
  • Gecko driver downloaded
  • path to Gecko driver added to PATH
Download and install Visual Studio Code

Assign some hot-keys to run it without a mouse, for example:


We will try not to use a mouse.

Open Visual Studio Code using the shortcut keys and open Terminal in the editor using the following hot-keys: Ctrl + `  and change the directory, for example cd c:/devel


Visual Studio Code works primarily with folders, so to start new project you need to just create new folder, for example: mkdir selenium_vsc , then change directory to the folder: cd selenium_vsc:


Init node.js project in the folder by the following : npm init -y


Install the libraries:

Mocha:

npm install mocha --save-dev


npm install chai --save-dev


Selenium Web Driver:

npm install selenium-webdriver --save-dev


Create test folder:  mkdir test

Change current directory to the folder: cd test

You may use Tab button to autocomplete the folder/file name

Create e2e folder for our end-to-end Selenium tests:  mkdir e2e

Change current directory to the folder: cd e2e

Create new empty file: break > first.test.js


Happy Linux and Mac OS users would just type: touch first.test.js

In the future you most likely will create new files by closing the terminal Ctrl + ` and then Ctrl + N , but now we just learn the Windows console commands.

Open the new file by typing the following: code -r first.test.js


Copy/paste our example code:

const {assert} = require('chai');
const webdriver = require('selenium-webdriver');
const Capabilities = require('selenium-webdriver/lib/capabilities')
        .Capabilities;
const capabilities = Capabilities.firefox();
capabilities.set('marionette', true);

let driver;

describe('Automation Playground tests', async () => {
    describe('When verifying the blog title', () => {
        it('should be equil to Automation Playground', async() => {
            const title = await driver.getTitle();
            assert.equal(title, 'Automation Playground');
        });
    });
});
before(async() => {
    driver = await new webdriver.Builder()
            .withCapabilities(capabilities).build();
    driver.get("https://automation-playground.blogspot.com");
});
after(async() => {
    await driver.quit();
});


Save Ctrl  + S

Go to the project root directory: cd ../..


Open package.json file by typing the following: code -r package.json


Copy/paste the following as script for test:

mocha ./test/e2e/*.test.js --timeout 30000


Save Ctrl + S

Go to the terminal by clicking twice Ctrl + `

Enter to run the test: npm test

The following test scenario will be executed:

  • run Firefox browser 
  • go to https://automation-playground.blogspot.com 
  • verify the blog's title
  • close Firefox browser


Test passed !

1/05/2018

NetBeans IDE for Selenium test automation (Maven, JUnit, Firefox browser and Java)

In this post earlier we set up NetBeans IDE for Selenium test automation without any testing framework and we had to download selenium server and Gecko driver manually.

But with Maven and a testing framework our work will be much easier. We will use JUnit 5 as a testing framework.

1. Run NetBeans IDE and create new Maven based Java Application project:


2. Enter name, location and Group id:


3. File > New > Other > select Selenium Test Case:


4.  Enter Class name and a package name, then click Finish:


5. A class with a simple test example will be created as well as a pom.xml file:


6. Open pom.xml file and update it to use new versions of Selenium and JUnit.
Just copy/paste the following dependencies instead of old ones:

Selenium:

        <dependency>
            <groupId>org.seleniumhq.selenium</groupId>
            <artifactId>selenium-java</artifactId>
            <version>3.7.1</version>
        </dependency> 

JUnit:

<dependency>
            <groupId>org.junit.jupiter</groupId>
            <artifactId>junit-jupiter-api</artifactId>
            <version>5.0.1</version>
            <scope>test</scope>
        </dependency> 


7. Open our test class and modify it with the following code:

package com.blogspot.autoqalab;

import org.junit.jupiter.api.Test;
import org.openqa.selenium.WebDriver;
import org.openqa.selenium.firefox.FirefoxDriver;
import org.openqa.selenium.support.ui.ExpectedCondition;
import org.openqa.selenium.support.ui.WebDriverWait;

public class PlaygroundTest {
    
    @Test
    public void testTitle() throws Exception {

        WebDriver driver = new FirefoxDriver();

        driver.get("https://automation-playground.blogspot.com");

        // Check the title of the page
        // Wait for the page to load, timeout after 10 seconds
        (new WebDriverWait(driver, 10)).until(new ExpectedCondition<Boolean>() {
            @Override
            public Boolean apply(WebDriver d) {
                return driver.getTitle()
                        .equalsIgnoreCase("Automation Playground");
            }
        });

        //Close the browser
        driver.quit();
    } 
}

8. Mouse right click on the test class > Test File or just click Ctrl + F6 to run the Selenium test

The following test scenario will be executed:

  • run Firefox browser
  • go to https://automation-playground.blogspot.com
  • verify the blog's title
  • close Firefox browser


Test passed !

1/04/2018

NetBeans IDE, Selenium, Firefox, JavaScript and Mocha with Chai

Now we will use Mocha testing framework and Chai assertion library in NetBeans IDE to write and execute tests.

We will use Mocha hooks (before, after) as well.

Also we will use console in Windows to set up the project and execute tests.

Skip the steps that you have already done:

1. Install the actual version of  Node.js

2. Install and set Git for Windows to use it as terminal.

3. Download Gecko driver from: https://github.com/mozilla/geckodriver  and store it in some folder, for example: C:\tools\web-drivers\ .

4. Add the driver location to the PATH:


5. Run NetBeans IDE

6. File > New Project


7. Select Node.js Application > Next and then enter the project name and location:


8. Click Next and select Create package.json:


9.  Git-bash and go to the project directory:


10. Install the libraries:

 Mocha:

npm install mocha --save-dev

Chai:

npm install chai --save-dev

Selenium Web Driver:

npm install selenium-webdriver --save-dev


Open package.json and see the dependencies have been added:


11. Create 'test' folder with unit and 'e2e' subfolders:


12.Open project Properties and select the subfolders as Unit Tests Folder and Selenium Tests Folder:


13. Click Selenium Testing and select Mocha test runner:


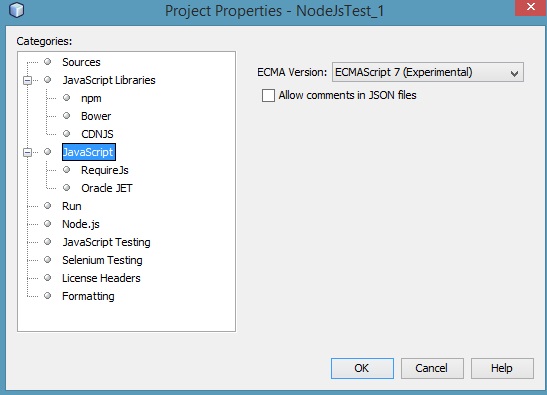
14. Set ES7 for the project in Settings:


15. Create 'blog.test.js' file in 'e2e' folder and copy/paste the following code:


const {assert} = require('chai');
const webdriver = require('selenium-webdriver');
const Capabilities = require('selenium-webdriver/lib/capabilities')
        .Capabilities;
const capabilities = Capabilities.firefox();
capabilities.set('marionette', true);

let driver;

describe('Automation Playground tests', async () => {
    describe('When verifying the blog title', () => {
        it('should be equil to Automation Playground', async() => {
            const title = await driver.getTitle();
            assert.equal(title, 'Automation Playground');
        });
    });
});
before(async() => {
    driver = await new webdriver.Builder()
            .withCapabilities(capabilities).build();
    driver.get("https://automation-playground.blogspot.com");
});
after(async() => {
    await driver.quit();
});


16. Click Run Selenium Tests:


The following test scenario will be executed:
  • run Firefox browser 
  • go to https://automation-playground.blogspot.com 
  • verify the blog's title
  • close Firefox browser


Test passed!

17. Lets run the test via command line in Git Bash, enter the following command in the project root directory:


mocha ./test/e2e/*.test.js --timeout 20000


Test will run again and...


Test passed again!

1/03/2018

Set up NetBeans IDE for Selenium test automation (Firefox browser and JavaScript)

In this case we will use NetBeans IDE for Selenium test automation using JavaScript and Firefox browser and JavaScript, ECMAScript 2016 (ES7) to be exact.

We will use the same simple test scenario as in this NetBeans & Selenium & Firefox & Java post.

1.Install the current version of  Node.js

2. Download Gecko driver from: https://github.com/mozilla/geckodriver/releases  and store it in some folder, for example: C:\tools\web-drivers\ .

3. Add the driver location to the PATH:


4. Run NetBeans IDE

5. File > New Project


6. Select Node.js Application > Next and then enter the project name and location:


7. Click Next and select Create package.json:


8.  Open package.json and add dev dependency to use selenium-webdriver:

    "devDependencies": {
        "selenium-webdriver": "^3.0.1"    }


9. Install the package:


10. Set ES7 for the project in Settings:


11. Create new js file or use existing main.js and copy/paste the following code.

We use a very simple example, without any test framework (i.e. Mocha.js) and without any assertion library (Chai.js):


const webdriver = require('selenium-webdriver');
const Capabilities = require('selenium-webdriver/lib/capabilities')
        .Capabilities;

const capabilities = Capabilities.firefox();

capabilities.set('marionette', true);

const driver = new webdriver.Builder().withCapabilities(capabilities).build();

driver.get("https://automation-playground.blogspot.com");

const verifyTitle = async () => {
    const title = await driver.getTitle();
    return title === 'Automation Playground';
};

const printTestResult = async () => {
    const result = await verifyTitle();
    console.log("Test " + (result ? "passed." : "failed."));
};

printTestResult();

driver.close(); 


12. Click Run Project button (or F6) to execute the following test scenario:

  • run Firefox browser 
  • go to https://automation-playground.blogspot.com 
  • verify the blog's title


Test passed!

1/02/2018

Set up NetBeans IDE for Selenium test automation (Firefox browser and Java)

Update: There is a community project ojdkbuild which provides Windows installers for OpenJDK.

1. Download selenium-server-standalone from: http://www.seleniumhq.org/download/

2. Download Gecko driver from: https://github.com/mozilla/geckodriver  and store it in some folder, for example: C:\tools\web-drivers\

3. Run NetBeans IDE

4. File > New Project


5. Click Next, enter project name and select project location, then click Finish:


1/01/2018

How to set English language in NetBeans IDE

After installation NetBeans IDE uses your regional settings. In order to change its interface language to English you should follow simple steps:

  • mouse right click on the NetBeans icon
  • select Settings
  • add --locale en at the end of the path
from Russian regional settings
  • click OK


Visual Studio Code, WebdriverIO, JavaScript and Chrome - cucumber html test report

 Apart Allure test report  we can use Cucumber test report in html format. We will follow this instructions . 1. Install  wdio-cucumberjs-js...