9/24/2021

Visual Studio Code, WebdriverIO, JavaScript and Chrome - cucumber html test report

 Apart Allure test report we can use Cucumber test report in html format.

We will follow this instructions.

1. Install wdio-cucumberjs-json-reporter that will create json files with test results data for each feature:

npm install wdio-cucumberjs-json-reporter --save-dev

2. Install multiple-cucumber-html-reporter that will generate Cucumber test report html:

npm install multiple-cucumber-html-reporter --save-dev

3. Install fs-extra that will clear directory with test reports before new test run:

npm install fs-extra --save-dev

4. Edit wdio.conf.js file:

  • add in the beginning:

const { generate } = require('multiple-cucumber-html-reporter');
const { removeSync } = require('fs-extra');

  • find in the file commented onPrepare and replace it with the following code:

     onPrepare: () => {
        // Remove the `.tmp/` folder that holds the json and report files
        removeSync('reports/html-results');
      },
      /**
       * Gets executed after all workers got shut down and the process is about to exit.
       */
      onComplete: () => {
        // Generate the report when it all tests are done
        generate({
          // Required
          // This part needs to be the same path where you store the JSON files
          // default = '.tmp/json/'
          jsonDir: 'reports/html-results',
          reportPath: 'reports/html-results',
          // for more options see https://github.com/wswebcreation/multiple-cucumber-html-reporter#options
        });
      },

5. Run the tests:

npm run test:bdd

6. Go to the folder with test results and find html:


7. Open the file:


We can observe steps for each test scenario:


9/23/2021

Visual Studio Code, WebdriverIO, JavaScript and Chrome - user scenario Input field and Button

 Let's add a tests scenario to test Input field and Button form:

  1. On the Home page click Elements link in the main navigation menu
  2. On Elements page click Input field and Button link
  3. On Input field and Button page enter "Alex" in the corresponding input field
  4. Click Submit button
  5. Verify "Your name is Alex" text result

We will continue using xpath locators.

How to find locators in Chrome browser is demonstrated here.

1. Add MainMenu page object:

const BasePage = require('../pages/base.page')

const elementsLinkXpath = "//div[@id='PageList1']//li/a[contains(text(),'Elements')]";

class MainMenuPage extends BasePage {
    get elementsLink () { return $(elementsLinkXpath) }

    async clickElementsLinkLink () {
        await this.elementsLink.click()
    }
}

module.exports = new MainMenuPage();

2. Add Elements page object:

const BasePage = require('./base.page')

const elements_url = 'https://automation-playground.blogspot.com/p/elements.html';
const inputFieldAndButtonLinkXpath = "//li/a[contains(text(),'Input field and Button')]";
const elementsPageTitleXpath = "//h3[@class = 'post-title entry-title' and contains(text(), 'Elements')]";

class ElementsPage extends BasePage {
    get inputFieldAndButtonLink () { return $(inputFieldAndButtonLinkXpath) }
    get elementsPageTitle () { return $(elementsPageTitleXpath) }

    async clickInputFieldAndButtonLink () {
        await this.inputFieldAndButtonLink.click()
    }

    async waitForElementsPageTitle () {
        await this.elementsPageTitle.waitForDisplayed({ timeout: 100000 })
    }
}

module.exports = new ElementsPage();

3. Add InputFieldAndButton page object:

const BasePage = require('./base.page.js');

const inputFieldAndButton_url = 'https://automation-playground.blogspot.com/2016/01/input-field-and-button.html';
const usernameFieldXpath = "//input[@id='user']";
const submitBtnXpath = "//button[@name='submit_action']";
const nameTextAreaXpath = "//textarea[@id='enteredName']";
const inputFieldAndButtonPageTitleXpath = "//h3[@class = 'post-title entry-title' and contains(text(), 'Elements')]";

class InputFieldAndButtonPage extends BasePage {
    get usernameField () { return $(usernameFieldXpath) }
    get submitBtn () { return $(submitBtnXpath) }
    get nameTextArea () { return $(nameTextAreaXpath) }
    get inputFieldAndButtonPageTitle () { return $(inputFieldAndButtonPageTitleXpath) }

    async open () {
        await super.open(inputFieldAndButton_url)
    }

    async waitForInputFieldAndButtonPageTitle () {
        await this.inputFieldAndButtonPageTitle.waitForDisplayed({ timeout: 100000 })
    }

    async enterUsername (name) {
        await this.usernameField.waitForDisplayed({ timeout: 100000 })
        await this.usernameField.setValue(name)
    }

    async clickSubmitBtn () {
        await this.submitBtn.click()
    }

    async getTextFromNameTextArea () {
        return await this.nameTextArea.getText()
    }
}

module.exports = new InputFieldAndButtonPage();

4. Add the test scenario in new feature file:

Feature: Input field and Submit button

Scenario: Verify Input and Submit page
  Given the Automation Playground blog open
  When I click Elements link in main menu
      And I click Input field and Button link on Elements page
      And I enter <name> in name input field
      And I click submit button
    Then the text in the text area should be equal <text>
    Examples:
      | name   | text                |
      | "Alex" | "Your name is Alex" |

5. Add new step definitions:

const MainMenuPage = require('../components/mainMenu.page.js');
const ElementsPage = require('../pages/elements.page.js');
const InputFieldAndButtonPage = require('../pages/inputFieldAndButton.page.js');

const { Before, Given, When, Then } = require('@cucumber/cucumber');
const assert = require('assert');

When('I click Elements link in main menu', async function () {
  MainMenuPage.clickElementsLinkLink();
  await ElementsPage.waitForElementsPageTitle();
});

When('I click Input field and Button link on Elements page', async function () {
  ElementsPage.clickInputFieldAndButtonLink();
  await InputFieldAndButtonPage.waitForInputFieldAndButtonPageTitle();
});

When('I enter {string} in name input field', async function (name) {
  await InputFieldAndButtonPage.enterUsername(name);
});

When('I click submit button', async function () {
  await InputFieldAndButtonPage.clickSubmitBtn();
});

Then('the text in the text area should be equal {string}', async function (text) {
  let actualText = await InputFieldAndButtonPage.getTextFromNameTextArea();
  assert(text, actualText);
});

6. Run the test

npm run test:bdd

The test scenarios executed with success:

7. Generate Allure report

allure generate reports/allure-results/ --clean

8. Open Allure report

allure open


9/10/2021

Visual Studio Code, WebdriverIO, JavaScript and Chrome

 For this setting I will use the great article: WebDriverIO Integration With Cucumber.

1. npm init -y

2. npm i --save-dev @wdio/cli

3. npx wdio config


4. npm install @wdio/allure-reporter --save-dev

5. npm install -g allure-commandline --save-dev

6. npm install --save moment

7. Create features directory with pages and step-definitions subdirectories. Create reports directory.


8. The first test scenario will be the same, so create first.feature file in features directory:

Feature: Automation Playground blog
As a test automation enthusiast
I want to write test for Automation Playground blog
So that I can practice Cucumber

Scenario: Verify the blog's title
  Given the Automation Playground blog open
    Then the Automation Playground blog title should be equal <title>
     Examples:
            |title                   |
            |"Automation Playground" |

9. WebdriverIO provides ability to easily create page objects, so create page objects in pages directory. The base page object:

module.exports = class BasePage {
        open (path) {
            browser.url(path);
        }
    }

Page object for the Home page:
const BasePage = require('./base.page')

const base_url = 'https://automation-playground.blogspot.com/'

class HomePage extends BasePage {
    open() {
        super.open(base_url)
    }
}

module.exports = new HomePage();

10. Create steps definition file in the corresponding directory. The content will be slightly differ from the previous setup:

const { Before, Given, When, Then } = require('@cucumber/cucumber')
const HomePage = require('../pages/home.page');

Given('the Automation Playground blog open', function () {
  HomePage.open()
});

Then('the Automation Playground blog title should be equal {string}', async function (title) {
  expect(browser).toHaveTitle(title);
});

11. Edit wdio.conf.js file according to the article

afterStep: function (step, context, { error, result, duration, passed, retries }) {
        if(error) {
            browser.saveScreenshot('./reports/screenshots/Fail_' + 
                                   moment().format('DD-MMM-YYYY-HH-MM-SS') + '.png')
        }
     },

and

    reporters: [['allure', {
            outputDir: './reports/allure-results'
        }]],   

and

   cucumberOpts: {
        // <string[]> (file/dir) require files before executing features
        require: ['./features/step-definitions/first.steps.js'],

and put on the top of the config file the following:

const moment= require('moment')

12.

And the scripts in package.json :
  "scripts": {
    "test:bdd": "npx wdio run ./wdio.conf.js",
    "generate:allure" : "allure generate reports/allure-results/ --clean"
  },

12. Run the test: 

npm run test:bdd


13. On my Windows computer I have to run cmd as Administrator, go to the folder and execute the following commands to generate and open Allure test report:

 allure generate reports/allure-results/ --clean

and then:

 allure open

The test report appears in browser:


9/06/2021

Visual Studio Code, selenium-webdriver, JavaScript, Cucumber and Chrome

Now we will use selenium-webdriver and Cucumber.js for end-to-end testing for the same test scenario.

(Be aware: selenium-webdriver and webdriver.io are not the same.)

I will use Visual Studio Code as a code editor again and Windows system.

For better Cucumber support you may install the following VSC extensions (Ctrl + Shift + X):

  • Cucumber (Gherkin) Full Support
  • Search and install 'Snippets and Syntax Highlight for Gherkin (Cucumber)

1. Create a directory for the project, initialize the node project in the directory:

npm init -y

2. Then install selenium-webdriver :

npm install selenium-webdriver --save-dev

3. Install cucumber.js :

npm install --save-dev @cucumber/cucumber

4. Then install chromedriver:

npm install chromedriver --save-dev

5. Install cucumber-html-reporter :

npm install cucumber-html-reporter --save-dev

So, the dev dependencies part in package.json looks like:


6. Add the following script:

"test": "./node_modules/.bin/cucumber-js features -f json:report/cucumber_report.json"


7. Create features directories with support and steps subdirectories:


8. In support folder create env.js file:

const { setDefaultTimeout } = require('@cucumber/cucumber');
setDefaultTimeout(60 * 1000);

9. In support folder create word.js file:

require('chromedriver');

const { setWorldConstructor } = require('@cucumber/cucumber');
const webdriver = require('selenium-webdriver');
const Capabilities = require('selenium-webdriver/lib/capabilities')
        .Capabilities;
const capabilities = Capabilities.chrome();

function World({ attach, parameters }) {
    this.driver = new webdriver.Builder()
    .withCapabilities(capabilities).build();
}

setWorldConstructor(World);

10. In the project "root" directory create index.js file:

const reporter = require('cucumber-html-reporter');
 
const options = {
        theme: 'bootstrap',
        jsonFile: 'report/cucumber_report.json',
        output: 'report/cucumber_report.html',
        reportSuiteAsScenarios: true,
        scenarioTimestamp: true,
        launchReport: true,
        metadata: {
            "App Version":"0.0.1",
            "Test Environment": "STAGING",
            "Platform": "Windows 10",
            "Executed": "Local"
        }
    };
 
    reporter.generate(options);

11. In features directory create first.feature file with the first test scenario written in Gherkin language:

Feature: Automation Playground blog
As a test automation enthusiast
I want to write test for Automation Playground blog
So that I can practice Cucumber

Scenario: Verify the blog's title
  Given the Automation Playground blog opened
    Then the Automation Playground blog title should be equal <title>
     Examples:
            |title                   |
            |"Automation Playground" |

12. In steps directory create first.steps.js file with the steps difinitions:

const { Before, Given, When, Then } = require('@cucumber/cucumber')
const assert = require('assert')

const base_url = 'https://automation-playground.blogspot.com/'

Given('the Automation Playground blog opened', function () {
  return this.driver.get(base_url);
});

Then('the Automation Playground blog title should be equal {string}', async function (title) {
  const actualTitle = await this.driver.getTitle();
  assert(title, actualTitle);
});

13. Also in steps directory create hooks.js file:

const { After, Before } = require('@cucumber/cucumber');

After(function(){
        return this.driver.quit();
  })

14. In the project "root" directory create report subdirectory with empty cucumber_report.json file

15. Run the test:

npm test

The following test scenario will be executed: 
  •  run Chrome browser
  •  go to https://automation-playground.blogspot.com
  •  verify the blog's title
  •  close Chrome browser


 The test passed!

16. Execute the following command to create html report from now populated cucumber_report.json:

node index.js


3/07/2021

Visual Studio Code, Nightwatch.js, JavaScript and Chrome

For now we will use Nightwatch.js for end-to-end testing.

I will use Visual Studio Code as code editor and Ubuntu system.

Create a directory for the project, initialize the node project in the directory:

npm init -y

Then install nightwatch.js:

npm install nightwatch chromedriver --save-dev


First nightwatch run without arguments to generate nightwatch.conf.js file: 

npx nightwatch

Create a directory for tests and write its location to the config file:


 Create a test file with the same test as in Visual Studio Code, Selenium, Firefox, JavaScript and Mocha with Chai article. 

We will verify the blog title.

module.exports = {
    "assert title": browser => {
        browser.url("https://automation-playground.blogspot.com");

        browser
            .assert.title("Automation Playground");
    }
}

To run the test execute:

npx nightwatch -e chrome

The test passed!


 Nightwatch.js allows us to use BDD style.

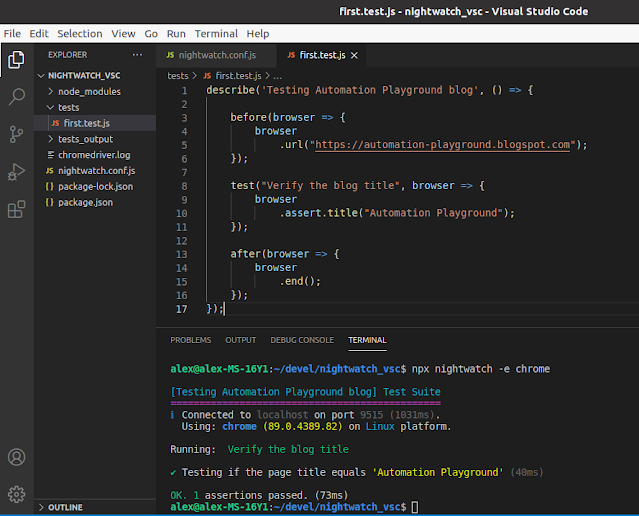
Let's use describe(), before(), test() and after() to better structure our test; you can copy/paste the example:

describe('Testing Automation Playground blog', () => {

    before(browser => {
        browser
            .url("https://automation-playground.blogspot.com");
    });

    test("Verify the blog title", browser => {
        browser
            .assert.title("Automation Playground");
    });

    after(browser => {
        browser
            .end();
    });
});

npx nightwatch -e chrome

The following test scenario will be executed again:

  • run Chrome browser
  • go to https://automation-playground.blogspot.com 
  • verify the blog's title
  • close Chrome browser

The test passed!


1/16/2018

Visual Studio Code, Selenium, Firefox, JavaScript and Mocha with Chai

Let's leave Netbeans IDE to Java and start using lightweight Visual Studio Code for JavaScript test automation.

Preconditions:
  • Node.js installed
  • Gecko driver downloaded
  • path to Gecko driver added to PATH
Download and install Visual Studio Code

Assign some hot-keys to run it without a mouse, for example:


We will try not to use a mouse.

Open Visual Studio Code using the shortcut keys and open Terminal in the editor using the following hot-keys: Ctrl + `  and change the directory, for example cd c:/devel


Visual Studio Code works primarily with folders, so to start new project you need to just create new folder, for example: mkdir selenium_vsc , then change directory to the folder: cd selenium_vsc:


Init node.js project in the folder by the following : npm init -y


Install the libraries:

Mocha:

npm install mocha --save-dev


npm install chai --save-dev


Selenium Web Driver:

npm install selenium-webdriver --save-dev


Create test folder:  mkdir test

Change current directory to the folder: cd test

You may use Tab button to autocomplete the folder/file name

Create e2e folder for our end-to-end Selenium tests:  mkdir e2e

Change current directory to the folder: cd e2e

Create new empty file: break > first.test.js


Happy Linux and Mac OS users would just type: touch first.test.js

In the future you most likely will create new files by closing the terminal Ctrl + ` and then Ctrl + N , but now we just learn the Windows console commands.

Open the new file by typing the following: code -r first.test.js


Copy/paste our example code:

const {assert} = require('chai');
const webdriver = require('selenium-webdriver');
const Capabilities = require('selenium-webdriver/lib/capabilities')
        .Capabilities;
const capabilities = Capabilities.firefox();
capabilities.set('marionette', true);

let driver;

describe('Automation Playground tests', async () => {
    describe('When verifying the blog title', () => {
        it('should be equil to Automation Playground', async() => {
            const title = await driver.getTitle();
            assert.equal(title, 'Automation Playground');
        });
    });
});
before(async() => {
    driver = await new webdriver.Builder()
            .withCapabilities(capabilities).build();
    driver.get("https://automation-playground.blogspot.com");
});
after(async() => {
    await driver.quit();
});


Save Ctrl  + S

Go to the project root directory: cd ../..


Open package.json file by typing the following: code -r package.json


Copy/paste the following as script for test:

mocha ./test/e2e/*.test.js --timeout 30000


Save Ctrl + S

Go to the terminal by clicking twice Ctrl + `

Enter to run the test: npm test

The following test scenario will be executed:

  • run Firefox browser 
  • go to https://automation-playground.blogspot.com 
  • verify the blog's title
  • close Firefox browser


Test passed !

Visual Studio Code, WebdriverIO, JavaScript and Chrome - cucumber html test report

 Apart Allure test report  we can use Cucumber test report in html format. We will follow this instructions . 1. Install  wdio-cucumberjs-js...