Showing posts with label Selenium. Show all posts

9/06/2021

Visual Studio Code, selenium-webdriver, JavaScript, Cucumber and Chrome

Now we will use selenium-webdriver and Cucumber.js for end-to-end testing for the same test scenario.

(Be aware: selenium-webdriver and webdriver.io are not the same.)

I will use Visual Studio Code as a code editor again and Windows system.

For better Cucumber support you may install the following VSC extensions (Ctrl + Shift + X):

  • Cucumber (Gherkin) Full Support
  • Search and install 'Snippets and Syntax Highlight for Gherkin (Cucumber)

1. Create a directory for the project, initialize the node project in the directory:

npm init -y

2. Then install selenium-webdriver :

npm install selenium-webdriver --save-dev

3. Install cucumber.js :

npm install --save-dev @cucumber/cucumber

4. Then install chromedriver:

npm install chromedriver --save-dev

5. Install cucumber-html-reporter :

npm install cucumber-html-reporter --save-dev

So, the dev dependencies part in package.json looks like:


6. Add the following script:

"test": "./node_modules/.bin/cucumber-js features -f json:report/cucumber_report.json"


7. Create features directories with support and steps subdirectories:


8. In support folder create env.js file:

const { setDefaultTimeout } = require('@cucumber/cucumber');
setDefaultTimeout(60 * 1000);

9. In support folder create word.js file:

require('chromedriver');

const { setWorldConstructor } = require('@cucumber/cucumber');
const webdriver = require('selenium-webdriver');
const Capabilities = require('selenium-webdriver/lib/capabilities')
        .Capabilities;
const capabilities = Capabilities.chrome();

function World({ attach, parameters }) {
    this.driver = new webdriver.Builder()
    .withCapabilities(capabilities).build();
}

setWorldConstructor(World);

10. In the project "root" directory create index.js file:

const reporter = require('cucumber-html-reporter');
 
const options = {
        theme: 'bootstrap',
        jsonFile: 'report/cucumber_report.json',
        output: 'report/cucumber_report.html',
        reportSuiteAsScenarios: true,
        scenarioTimestamp: true,
        launchReport: true,
        metadata: {
            "App Version":"0.0.1",
            "Test Environment": "STAGING",
            "Platform": "Windows 10",
            "Executed": "Local"
        }
    };
 
    reporter.generate(options);

11. In features directory create first.feature file with the first test scenario written in Gherkin language:

Feature: Automation Playground blog
As a test automation enthusiast
I want to write test for Automation Playground blog
So that I can practice Cucumber

Scenario: Verify the blog's title
  Given the Automation Playground blog opened
    Then the Automation Playground blog title should be equal <title>
     Examples:
            |title                   |
            |"Automation Playground" |

12. In steps directory create first.steps.js file with the steps difinitions:

const { Before, Given, When, Then } = require('@cucumber/cucumber')
const assert = require('assert')

const base_url = 'https://automation-playground.blogspot.com/'

Given('the Automation Playground blog opened', function () {
  return this.driver.get(base_url);
});

Then('the Automation Playground blog title should be equal {string}', async function (title) {
  const actualTitle = await this.driver.getTitle();
  assert(title, actualTitle);
});

13. Also in steps directory create hooks.js file:

const { After, Before } = require('@cucumber/cucumber');

After(function(){
        return this.driver.quit();
  })

14. In the project "root" directory create report subdirectory with empty cucumber_report.json file

15. Run the test:

npm test

The following test scenario will be executed: 
  •  run Chrome browser
  •  go to https://automation-playground.blogspot.com
  •  verify the blog's title
  •  close Chrome browser


 The test passed!

16. Execute the following command to create html report from now populated cucumber_report.json:

node index.js


1/05/2018

NetBeans IDE for Selenium test automation (Maven, JUnit, Firefox browser and Java)

In this post earlier we set up NetBeans IDE for Selenium test automation without any testing framework and we had to download selenium server and Gecko driver manually.

But with Maven and a testing framework our work will be much easier. We will use JUnit 5 as a testing framework.

1. Run NetBeans IDE and create new Maven based Java Application project:


2. Enter name, location and Group id:


3. File > New > Other > select Selenium Test Case:


4.  Enter Class name and a package name, then click Finish:


5. A class with a simple test example will be created as well as a pom.xml file:


6. Open pom.xml file and update it to use new versions of Selenium and JUnit.
Just copy/paste the following dependencies instead of old ones:

Selenium:

        <dependency>
            <groupId>org.seleniumhq.selenium</groupId>
            <artifactId>selenium-java</artifactId>
            <version>3.7.1</version>
        </dependency> 

JUnit:

<dependency>
            <groupId>org.junit.jupiter</groupId>
            <artifactId>junit-jupiter-api</artifactId>
            <version>5.0.1</version>
            <scope>test</scope>
        </dependency> 


7. Open our test class and modify it with the following code:

package com.blogspot.autoqalab;

import org.junit.jupiter.api.Test;
import org.openqa.selenium.WebDriver;
import org.openqa.selenium.firefox.FirefoxDriver;
import org.openqa.selenium.support.ui.ExpectedCondition;
import org.openqa.selenium.support.ui.WebDriverWait;

public class PlaygroundTest {
    
    @Test
    public void testTitle() throws Exception {

        WebDriver driver = new FirefoxDriver();

        driver.get("https://automation-playground.blogspot.com");

        // Check the title of the page
        // Wait for the page to load, timeout after 10 seconds
        (new WebDriverWait(driver, 10)).until(new ExpectedCondition<Boolean>() {
            @Override
            public Boolean apply(WebDriver d) {
                return driver.getTitle()
                        .equalsIgnoreCase("Automation Playground");
            }
        });

        //Close the browser
        driver.quit();
    } 
}

8. Mouse right click on the test class > Test File or just click Ctrl + F6 to run the Selenium test

The following test scenario will be executed:

  • run Firefox browser
  • go to https://automation-playground.blogspot.com
  • verify the blog's title
  • close Firefox browser


Test passed !

1/03/2018

Set up NetBeans IDE for Selenium test automation (Firefox browser and JavaScript)

In this case we will use NetBeans IDE for Selenium test automation using JavaScript and Firefox browser and JavaScript, ECMAScript 2016 (ES7) to be exact.

We will use the same simple test scenario as in this NetBeans & Selenium & Firefox & Java post.

1.Install the current version of  Node.js

2. Download Gecko driver from: https://github.com/mozilla/geckodriver/releases  and store it in some folder, for example: C:\tools\web-drivers\ .

3. Add the driver location to the PATH:


4. Run NetBeans IDE

5. File > New Project


6. Select Node.js Application > Next and then enter the project name and location:


7. Click Next and select Create package.json:


8.  Open package.json and add dev dependency to use selenium-webdriver:

    "devDependencies": {
        "selenium-webdriver": "^3.0.1"    }


9. Install the package:


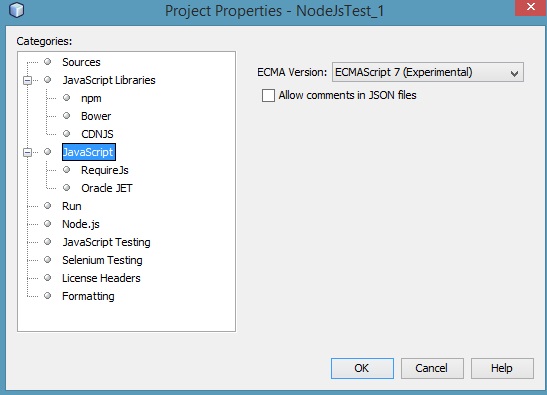
10. Set ES7 for the project in Settings:


11. Create new js file or use existing main.js and copy/paste the following code.

We use a very simple example, without any test framework (i.e. Mocha.js) and without any assertion library (Chai.js):


const webdriver = require('selenium-webdriver');
const Capabilities = require('selenium-webdriver/lib/capabilities')
        .Capabilities;

const capabilities = Capabilities.firefox();

capabilities.set('marionette', true);

const driver = new webdriver.Builder().withCapabilities(capabilities).build();

driver.get("https://automation-playground.blogspot.com");

const verifyTitle = async () => {
    const title = await driver.getTitle();
    return title === 'Automation Playground';
};

const printTestResult = async () => {
    const result = await verifyTitle();
    console.log("Test " + (result ? "passed." : "failed."));
};

printTestResult();

driver.close(); 


12. Click Run Project button (or F6) to execute the following test scenario:

  • run Firefox browser 
  • go to https://automation-playground.blogspot.com 
  • verify the blog's title


Test passed!

1/02/2018

Set up NetBeans IDE for Selenium test automation (Firefox browser and Java)

Update: There is a community project ojdkbuild which provides Windows installers for OpenJDK.

1. Download selenium-server-standalone from: http://www.seleniumhq.org/download/

2. Download Gecko driver from: https://github.com/mozilla/geckodriver  and store it in some folder, for example: C:\tools\web-drivers\

3. Run NetBeans IDE

4. File > New Project


5. Click Next, enter project name and select project location, then click Finish:


Visual Studio Code, WebdriverIO, JavaScript and Chrome - cucumber html test report

 Apart Allure test report  we can use Cucumber test report in html format. We will follow this instructions . 1. Install  wdio-cucumberjs-js...